I hope that life has been good to you since my last post.
The title says it all. I have jumped headfirst into a deep vortex. Actually, I have a feeling that I just might meet a good number of you there as well.
Well, maybe not an actual vortex, not at this point anyway. Time will tell if the waters ever swirl wildly for me there.
I'm dipping my toe into the Handmade at Amazon (HA) waters. I'm keeping with my established shop branding as you can see....

The shop setup was a bit confusing but they have very good phone support if you need immediate help with anything. Um yes, you heard er read that right. Actual phone support with real live people to actually HELP you. And if you don't need an immediate answer to your inquiry, they get back to you quickly via email. Yes, I gratefully took advantage of both. Some things were less confusing than when I set up my Etsy shops and some more so.
While I can't provide any helpful hints yet, I can show you what the pages and listings look like if you haven't seen them for yourself.
The above and following pictures are of my storefront...

...there's a place for shots of our studios...

...but as my studio is currently a total disaster, I used the above pictures
of tools and supplies,
and that fabulous picture my friend Nikki took of my stakes.
At this point, I only have 8 things listed.
This is how the shop pages look:
This is how the shop pages look:

My eye is still getting used to those neutral backgrounds.
You all know how I love my props.
Here is an actual listing:

I didn't find the actual listings hard to do.
The most difficult thing about listing is figuring out what keywords, etc work for them.
I have researched their SEO but obviously haven't a clue
as I'm invisible until you reach the outer edges of the vortex wall.
You have to upload photos one at a time.
They can't be re-arranged so if you want to move them, you have to delete
them and upload them again in the desired spot.
There isn't a "copy" function for listings.
Those are the biggest drawbacks I see to listing at this time.
There isn't a "copy" function for listings.
Those are the biggest drawbacks I see to listing at this time.
I find the site difficult to navigate as a seller.
I know though that it will all become second nature in time.
They do have excellent seller support and
seem responsive to our reactions, wishes and suggestions.
seem responsive to our reactions, wishes and suggestions.
I'll keep you posted about my experience over there,
and would really like to hear about yours.
For once I don't have a ridiculous amount of pictures to share with you.
I know! Whaaa?????
I know! Whaaa?????
So I can share one of those DIY projects I told you about on the last post.
First, I'll show you what's been going on in the studio.
I'm keeping things simple in the HA shop.
Earrings and only earrings right now.
I'm keeping things simple in the HA shop.
Earrings and only earrings right now.

A Vibrant Ruby
Ruby in zoisite, Raku by Elements Pottery
and fine silver sheet which I have oxidized to
harmonize with the colors in the Raku.

Porcelain spikes by Petra.
Un-named at this point.
They make me think of a Snow Goth but
that sounds meh as a name.


Raku Gunmetal Spikes
How's that for an exciting name?
You might notice that on HA,
I am naming most things as to what they are
in hopes that they might be found in search.
Did I mention learning curve?
Anyway, these cool spikes were made by Petra
and paired with fine and sterling silver.

Borealis Dreams
Living on the edge here with an actual name.

Midnight Intrigue
otherwise known as "assemblage, mixed media earrings..."
on HA.
Petra ceramics, lampwork, textured brass.
Love these Baroque drops!

oooh here's a fun name...
"brass, mixed media, metal and porcelain earrings"
that's just sad.

Verdigris Daggers
Brass with Czech beads in a yummy shade of luminous green.
Verdigris in glass!
Matches the actual Verdigris patina almost perfectly.

Pendulum
Bronzy-gold Petra connectors paired with
turquoise lampwork and mop.
The textured brass has a heat patina underneath the oxidation.
Dark and edgy paired with lustrous elegance.

Ancient Hoard Series - Crystal Spears

Un-named, but you know it will have something to do with those
fabulous Petra cobalt spikes.


A Glimpse of Love
An assemblage bracelet full of vintage goodies, adorned with
a platinum heart from Petra, mop and wee lampwork headpins by EmeraldFlame.

Ancient Hoard Series -
Whispered Words
Stainless steel chainmaille, brass filigree with the hoard technique,
sterling and a ceramic bead with indiscernible text by
Andrea Salkowe.
One look at that cool bead and I had the whole design in mind in an instant.
I've finished up a complimentary necklace but haven't done
the photos yet.

Let It Rain
Versatile wrap bracelet can also be worn as a necklace


A wrap bracelet/necklace with stainless steel chainmaille,
a ceramic clasp and Raku drop by Petra and a wee vintage metal umbrella charm.
This bracelet wraps three times around the wrist.
The intriguing colors in the ceramic glazes are gorgeous.


This clasp by Petra has a purplish-bronzy hue.
It's fabulous!
It sits on the top of the hand as the focal of this bracelet
with the stainless steel chainmaille going around the wrist.

Her Treasure
A romantic assemblage of old and new.
Enameled vintage components, rhinestones,
fossil blastoids
and torch-fired hammered headpins in a rich deep pink/burgundy hue.

The Rose Trellis
Another pair of assemblage earrings
featuring vintage enameled components.
Love the colors and shapes in these earrings.

Colors of the Canyon
Assemblage earrings with a bit of boho flair.

Boho Hoops
Oxidized multi-wire hoops with intricate dangles
in shades of green and berry pink.
Feminine but not "girly".
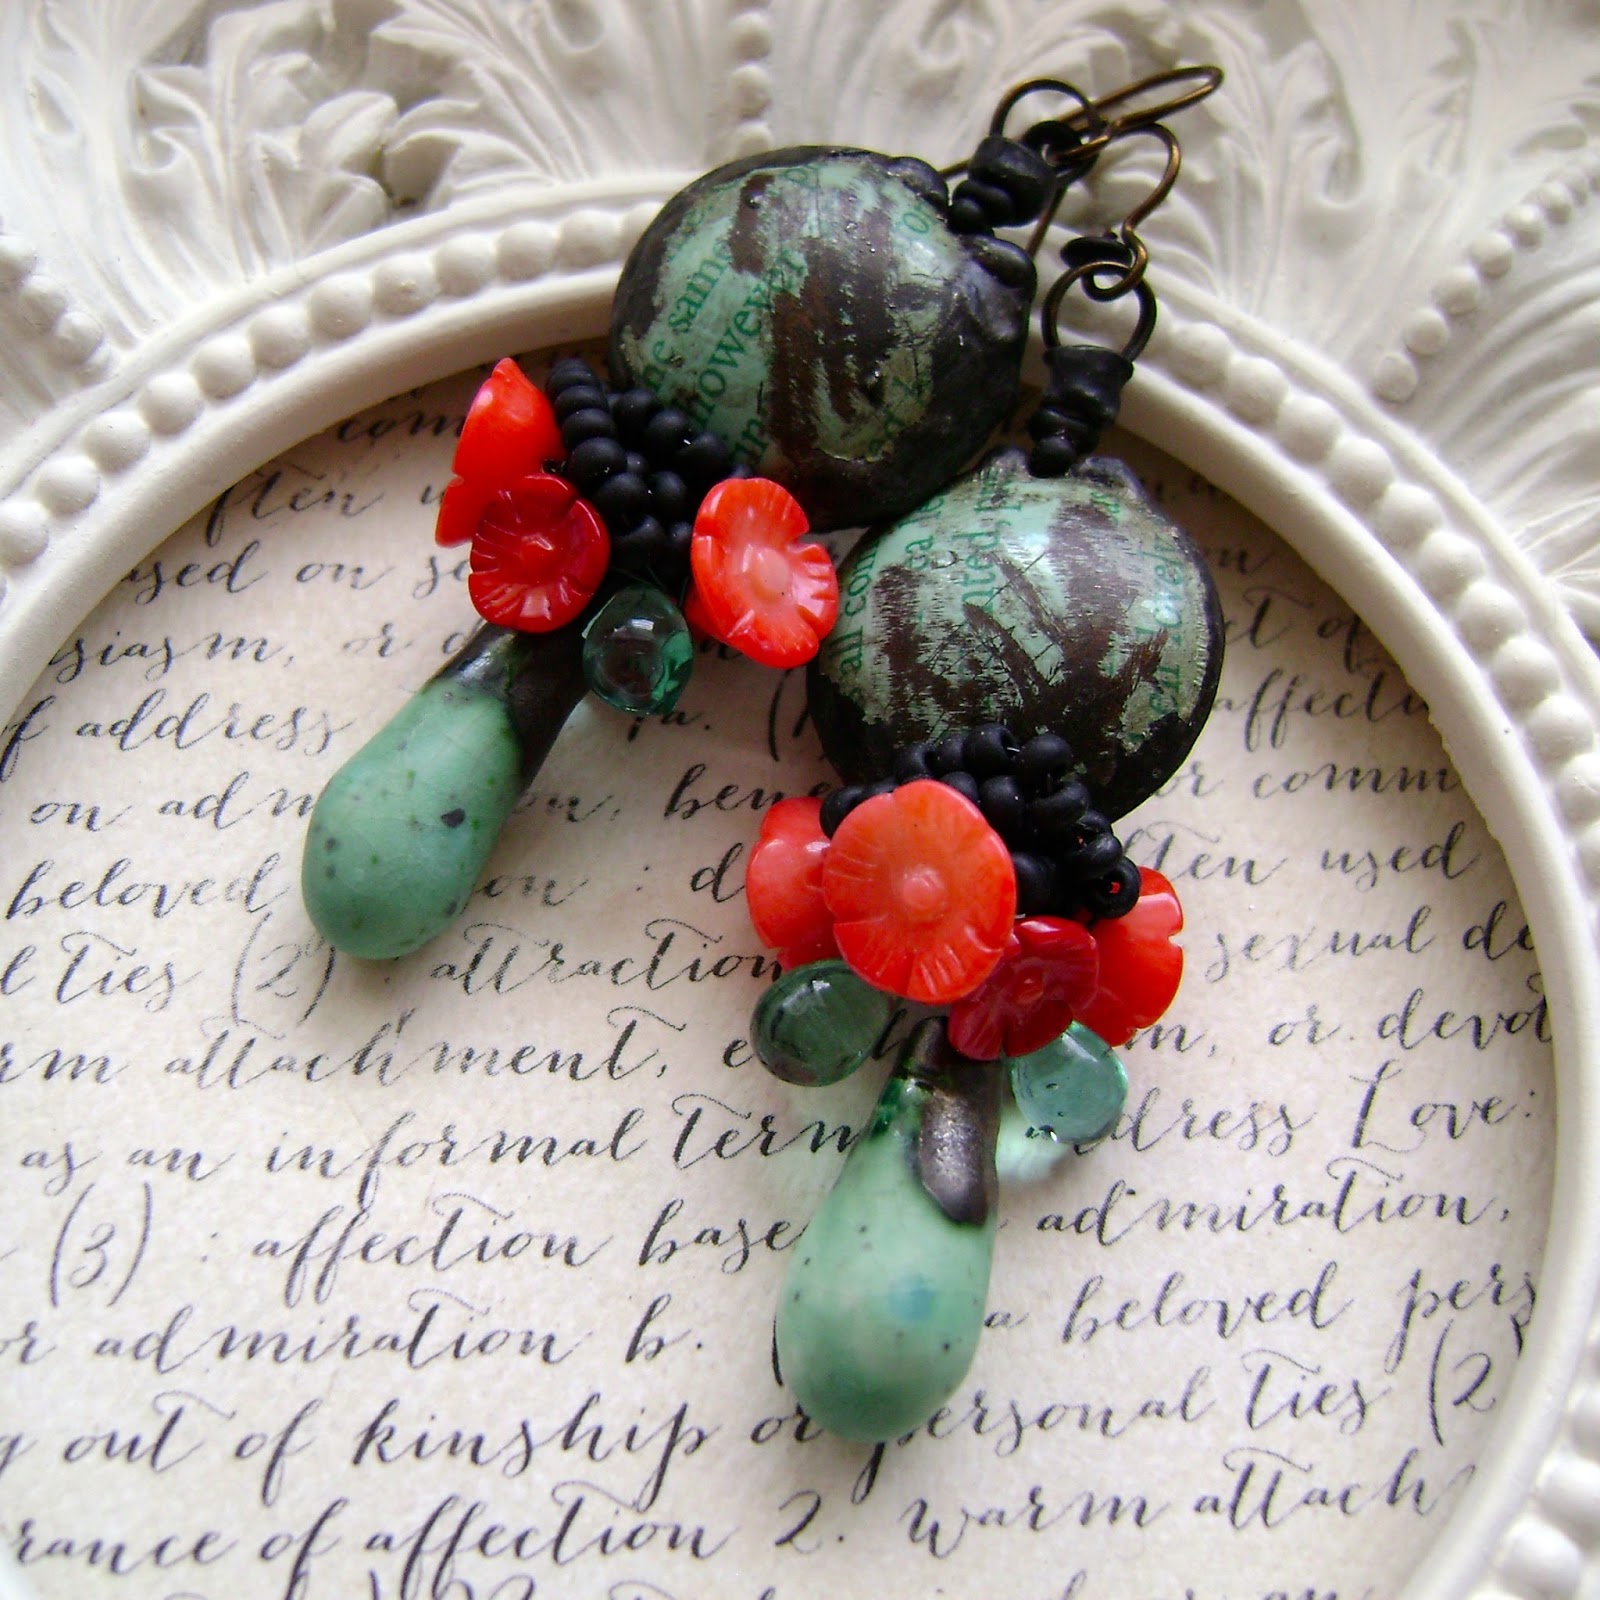
Assemblage earrings with upcycled tin beads,
carved coral flowers,
vintage glass teardrops and Petra droplets in
Robins egg blue

I Remember the Rose
Vintage watch faces paired with vintage enameled rose pieces,
vintage teardrops, rhinestones,
crystals and petal beadcaps.

Cognac
Petra double drops,
textured brass, amber hued lampwork by Emerald Flame
and titanium posts.

The Night Garden
Double hoops with carved coral flowers, crystals, rhinestones
and wee lucite bell flowers in a soft grey-blue hue.
The darkened hoops and the subtle flowers
make me think of strolling through a garden in the dark of night.

First Bloom
Vintage pink and red enameled roses on a burgundy background,
accented by vibrant red leaves with striking turquoise
droppers by Petra.
This is my favorite color combo
and I'm succesfully resisting the urge to keep these.
So far.

The Urn of Red Roses
Assemblage earrings of vintage enameled pieces.
These urns are vintage Matisse Rembrandt enamel.
I know, I know.
Serious collectors of these pieces might be cringing that
I've dis-assembled a necklace
to repurpose for earrings.
Couldn't help myself.
The urns needed flowers bursting from them.

The Single Red Rose
Yes, I've been on quite the romantic red rose earring kick.

Ancient Hoard Series -
The Wise Men
I was able to acquire a few of these vintage
connectors featuring fascinating mustached men's faces.
This seemed a perfect pairing for them.
Brass filigree drops with the hoard technique,
mop and deep red lampwork by Emerald Flame.

Fossil crinoid cabochons with asymmetrical forged pewter blades.
Deep red lampwork by Emerald Flame.

Ammonite fossil assemblage earrings.
Kristi Bowman made these fantastic copper ammonite castings.
I've paired them with fossil blastoids that look like little flower buds,
fossilized sea lily stems (crinoids), rhinestones and wee glass beads.
Hammered torch fired enamel headpins in a soft mossy green
add a bit of organic color to these assemblage earrings.

Kristi also made these ammonites.
She makes so many cool things, but I'm always drawn to her ammonites.
These have been paired with soft green lampwork, again by Emerald Flame
and shields of hammer textured, verdigris patinated, melted edge copper.
Well, that's it from the bench.
~~~~~~~~~
You might remember that a few years ago, I snapped a tendon in my right elbow.
Ouch!
I've recently strained it again, and being right handed that's a problem.
This is nowhere as serious as the previous injury,
and to keep it from getting to that point,
and to keep it from getting to that point,
I'm resting my arm for a week or two.
I should be back to the bench soon.
Not happy to sit around idle....
I have a couple new vintage links listed in
Each of them are unusual.
These links are exceptional...

Beautiful repouse leaves and blooms
I think these will make beautiful bracelet focals.
I have never seen double links like the following....

I'm going to make a chatelaine necklace using one of these.
It will be the focal from which all of the chains will hang.
The following are the smallest links of this type that I've run across:

Intricate and lovely detailing.
~~~~~~~~~
Now for the DIY project...
Many of you have seen this amazing antique necklace display
on Pinterest.
Apologies, but I don't have the original source of the photo
to give proper credit.
At any rate,
it's an incredibly gorgeous display.
While I would prefer finding one with all of the authentic charm
that this display has,
the odds of that seem pretty slim.
Surely, I can up-cycle a display I already have but am no longer using,
since I'm not currently doing shows.
While I would prefer finding one with all of the authentic charm
that this display has,
the odds of that seem pretty slim.
Surely, I can up-cycle a display I already have but am no longer using,
since I'm not currently doing shows.
I wanted to alter a necklace display,
using dark charcoal velvet.

I checked all of my local sources for grey velvet.
Nada, nothing, zilch.
hmmmm.
So I get the bright idea to try a painted velvet effect.
How hard could that be, right?
I got one of my old displays that had some nicks and tears.
Instead of a small display, I chose this large one
that didn't need a stand.
These displays showcase my larger statement necklaces really nicely.
Should be perfect in dark grey.
These displays showcase my larger statement necklaces really nicely.
Should be perfect in dark grey.


First, I roughed up the surface with sandpaper to give it some 'tooth',
so that the paint had something to stick to.
Then I applied a coat of black gesso and let it dry.

I painted a couple coats of matte black, and matte charcoal (called zinc).
Then I dabbed at the paint
with a damp art sponge to get a mottled texture.
I was going for a crushed velvet effect.
It resulted in a weird shiny surface where the sponge texturing was applied.
No problem, because that wasn't going to be the
last coat on the display.

I had an old metal ornament that I thought would be perfect on the top.
So I painted it with gesso then with the matte black too.
Gesso is basically a good primer or binder between the
item and the paint.

Here's what I used...

I didn't prime the finial with gesso before
painting it with the black paint
because I intended to sand some of the paint back off
for a distressed effect.
I've already sanded it here...

Next, I applied a coat of water-based MATTE
varnish.
Notice I said matte.
 hmmmmmm Not so much.......

Way too shiny.
I'll deal with that later.
Next I applied the metal ornament to the top of the display.


I then affixed the finial to the metal ornament...


I used liquid nails.
Worked perfectly.

Now what to do about that shininess.
I didn't have any other matte sealer to try.
I thought about dusting the surface with cornstarch
but figured it might just make a big nasty mess.
Since I live out in the country, it's a bit of a trek to the nearest craft store,
so I scrounged around to see what I had on hand.


hmmmmmmm
Green scrubbies are kind of the equivalent of duct tape, right?
Sure they are...
which means I can use them for anything!

I gently rubbed it all over the surface.

It did tone down the shininess a little bit.
It also pulled bits of paint off here and there,
mostly in the back, fortunately.

IMHO, it is still too shiny to look good as a photo prop.
Ok, so maybe green scrubbies aren't a fix all.

It's better, but still not quite right.


Here's what the display looks like now with jewelry
displayed on it,
after the green scrubby treatment.
displayed on it,
after the green scrubby treatment.
I think it competes with the jewelry.
I picked up some dark grey chalk paint last time I was in town.
That ought to do the trick.
So if you see this display being used for my shop photos,
you'll know that the chalk paint worked.
If not, it's back to the drawing board.
How's that for a DIY fail?
I didn't say I was going to share a DIY success,
I just said I'd share a DIY project.
The next one is a complete success.
Really.
No, really.
I'll save it for another time
No, really.
I'll save it for another time
when I don't have a gazillion photos for you to wade through.
So that's it.
Shortest blog post in the history of AnvilArtifacts!!
And you were here to see it!
Wooboy.
Many thanks to all of you for stopping in.
Hope you all have a wonderful Autumn,
filled with happy times and beautiful sights.
filled with happy times and beautiful sights.
Till next time,
Enjoy!

(photographer unknown)
kwaheri
(goodbye in Swahili)