Some of you have been coping with crazy amounts of snowfall, others with devastating twisters, and yet others with fires, record warmth and rains. Sincere hopes that you've all fared well through it all.
You know how much I enjoy your delightfully witty and kind comments. I wasn't able to respond individually to each of you this last time, but thank you all for taking the time to share your thoughts!
I'd like to extend a warm welcome to our new commenters. First, welcome Star of the East. I've long been a fan.
And welcome to Laura. Thanks for inquiring about The Key to My Heart earrings. They were listed last week and have already sold. I tried to contact you to let you know they were being listed. Sorry, but I wasn't able to locate contact info for you.
Lucie- you're too funny! As long as no one shaves the bears in your area, you're safe!
And Petra...really? Shaved bears were the original bearded ladies?! Who knew? Well, besides you, that is.
The things I learn from you guys....always fascinating.
I was contacted by a lovely lady, new to jewelry making who had a few questions about tools, etc. I offered to do a blog post on some of the things newcomers may have on hand and can try. These are a few of the make do tools that I share with my students when teaching a class. Not all of these are unique or original to me as many people have discovered effective alternative "cheats" to use instead of the high priced specialty jewelry tools.
I do recommend buying the best tools you can afford when making the investment into high grade tools IF and here's the point, if you will be using them frequently or they need to have sufficient strength to hold up to the type of use you will be subjecting them to. Otherwise, make do's work just fine.
Here are some of my fav's;
I have and use often, a rawhide mallet, but if you don't, try a rawhide dog bone. The large kind with the knot on the end. Look for one that has a flat portion in the knot that can act as a hammer.

On the left are two pairs of jewelers shears. My preference are those to the far left.
For cutting tin, I prefer the Fiskars shears.
They are readily available at fabric and craft stores.
Another effective choice are the Joyce Chen kitchen shears.
These will work on thin-medium thickness sheet metals
and are a joy to use.

I love using my Fretz mini stakes,
my sinosoidal stake and other jewelers stakes.
Of course they weren't in my tool box when I first started working with metals.
Most of the above stakes are from Harbor Freight.
Their intended use is for automotive repairs.
They lack the mirror polish found on jewelers stakes,
but work just fine for shaping metals.
The meat tenderizer makes a great metal texturizer.
It was a gift from a very dear friend who thought it might just
make interesting textures on metal. She was right.
That shows how useful it is to look at all sorts of non traditional items
when collecting tools for yourself.
The brass pieces are intended to be used for scientific experiments,
but I like using them to shape metal, by hammering the metal around their form.
All of these are an inexpensive way to see if you like metal forming before you invest in more expensive forming tools, such as these.

Below are my jewelers grade bracelet, ring and bezel mandrels.

Baseball bats, rolling pins, pieces of pvc pipe, soup cans, etc
can be used as bracelet mandrels.
Lengths of dowels can be used instead of ring or bezel making mandrels.
Below is an example of the sets the second most interesting man in the world
makes for student use during my classes.
I always keep a set handy because he's considerately
marked the sizes on each dowel section.
Makes it easy to quickly match sizes as needed while I'm working.

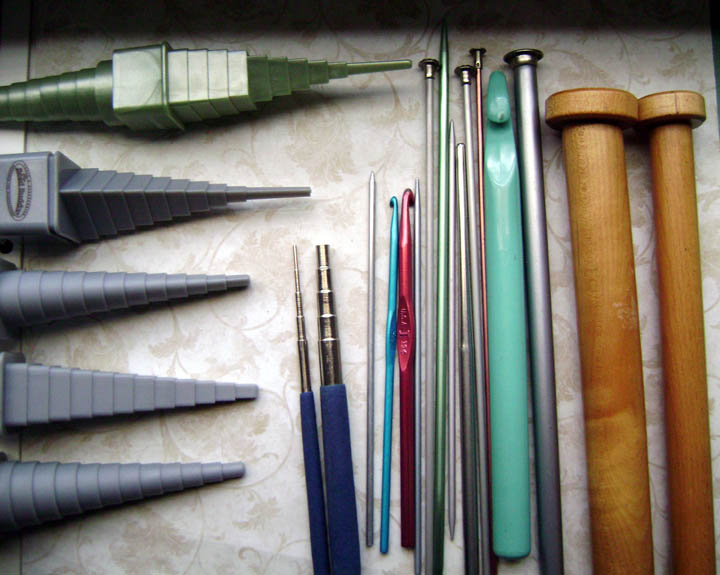
On the left you see mandrels intended to form wire or soft, thin metals.
On the right are some cheats.
Knitting and crochet needles, etc.

These are traditional steel bench blocks in the lower half of the photo,
and a small jewelers anvil
along with a sad iron in the upper right corner.
Sad irons are perfect for using as bench blocks and easy to find at antique stores.
There is a rubber block and a jewelers sandbag pictured as well.
These are used under the bench blocks to absorb the bounce
when hammering on them.

A section of railroad tie makes an excellent anvil.
I love the rough texture this imparts to the metal when I use it.

This is an anvil from Harbor Freight.
Works just fine.
Sitting on a large jewelers sandbag.

I often use a thick piece of leather when hammering on this anvil
to protect the metal from the rough surface texture.
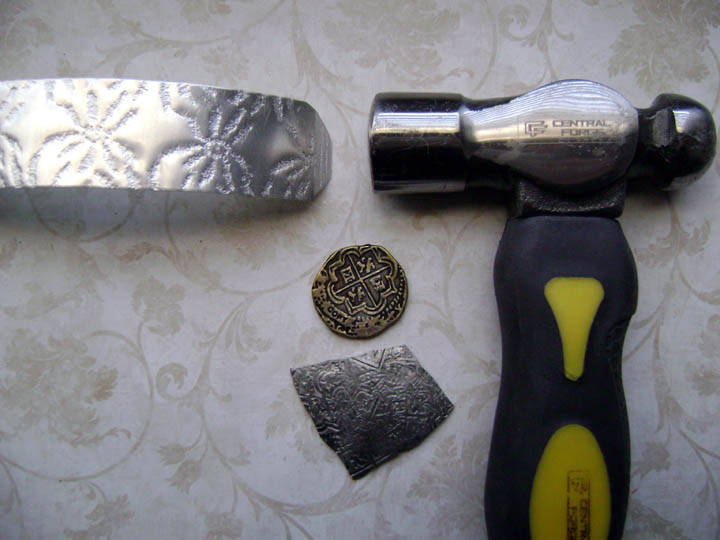
The piece of aluminum on the left has been run through my rolling mill.
If you don't have access to a rolling mill,
you can place on a bench block or anvil;
the item you want to use for texture,
then a piece of thin, annealed metal on top of the texture item.
Use a flat faced hammer and hammer away.
Tape the metal to the item if you need to keep it in place
while hammering.
This is what you'll end up with...

This method limits you as to what type of textures you can achieve,
but it's an effective alternative.

On the left is a diamond tipped scribe.
This is my tool of choice when applying linear designs into metal.
However, anything with a sharp point can be used to scribe or
scratch a design into metal. The sharper the point,
the thinner the line made.

These are also effective for scribing.
A paper piercer and assorted dental tools.

On the left you see jewelers burnishers, bezel pushers, bone folders and an agate burnisher.
The handle of a disposable plastic razor or
the rounded end of a wooden clothes pin holder can also be used as a bezel pusher.
They are soft enough that they won't usually scratch the stone cabachon as you set it.
A flat polished agate cabachon, as pictured on the right,
can be used instead of an agate burnisher.
The screen installing roller pictured at the top of this picture can be used
to make leaf veins in thin metal if you don't have a hammer with a thin linear face.

Empty Bic pen cases are a perfect way to store or transport saw blades.

Easy to access the blades as needed.
Well those are the make do tools that I use frequently.
Hope this info might be helpful to some of you.
I did get a few new things made since my last post.
While I'm still on an earring kick, I did get a bracelet and necklace finished up as well....
Names for these new pieces?
Nope, not a one!

Small Apatite nuggets, small faceted pyrite beads and
large pyrite nuggets combined with turned wooden shapes
that remind me of inverted Russian buildings.
Another view....
Because I love the way they look hanging from Daniel's sculpture.
Thought you might too.
An additional reason for two views?
stay tuned......

A bit of text and aging for mystery all hanging from an arc of wire.
They go nicely with this fold formed necklace.....

Apatite nuggets, both large and small with matte agate and
matte amazonite beads.
A faceted amazonite teardrop bead provides the final bit
of delicate color as it adorns the back of your neck.

I love how this turned out.

This bracelet features a rock that I partially polished on my lap machine.
I cut grooves into the back of it for the purpose of wire wrapping.
A modern day tin type of an adorable baby sporting a mohawk
graces the front of the stone.
Attached to an adjustable soldered wire cuff , for an unusual,
one of a kind bracelet.

A new version of Rose Red.
Black tourmaline nuggets, frosted polka dot lampwork beads by Nadin Art Glass,
black stone teardrops combine with vintage black glass teardrops
in these romantic yet not too sweet earrings.

Guess you've figured out that you get two versions of each piece
when there's so few things to share with you, eh?
Yup, here we go again.
A one an a two.....

These have vintage carved roses.
Not sure if they are bone or??
Pyrite nuggets and brass stampings in a wire frame.

Smaller than my normal fare.
These delicate roses seemed to need the understated setting.

Faceted Raspberry glass, white keishi pearls
and grey freshwater pearls combined
with wood and text in wire hoops.

And that folks is the end of the line for new jewels.
Even with two pictures of each, this is a surprisingly short post for me, eh?
Things that make you go hmmmmmm.
Don't ask me, I assure you I don't know what's up with that.
a sweet picture for you this week.
Doesn't get more adorable than this

Kwaheri (Swahili)
Your postings are always so wonderful !!
ReplyDeleteNice tips and tools there. WOW.
Your new work has me oogling and cooing with delight. Seriously fine start on breaking in the new studio space!!
Thanks so much, Pipn! Hope you know how very much I appreciate your kind comments.
DeleteYour tool post is making me feel bereft but also weirdly encouraging because now I understand that you're able to make so many wonderful things with your tools and your mad skillz and I'm tool-less and clue-less for some of your techniques so there's a wide world of knowledge and tooling up to be had....something to look forward to.
ReplyDeleteWas bummed that my repousse workshop was canceled this weekend because I did buy a sandbag for it last week. Thought I could get a new techniques under my belt.
I've already used my "Straighten up and Pyrite" name for earrings myself so I can't give you that! how about "Bon Apatite" ?
OK now I'm just getting punchy. Thanks for the post!
Oh yes, tooling up is definately to be had. Too bad you missed out on that class. Hahahaha, so sad that "Straighten up and Pyrite" was already used. You're hilarious when you're punchy!
DeleteGreat post!! Love your new work, love that you use your girl to hold earrings - I love mine, but haven't tried that so just might! I LOVE that bracelet with the baby on the stone - I've been working in a similar vein.
ReplyDeleteFantastic work, congratulations, girl! :)
Thanks Juliette! These little sculptures are so fun to use as props. Your recent work has been wonderful!
DeleteI'm drooling on your jeweler's stakes!!! That will be my next investment! By the way, great post about tools! and I use jeweler sandbag as a stake too, one I made with reclaimed leather and sand from the beach inside.
ReplyDeleteAmazing new earrings, I particularly love the ones with the carved roses, the shape of the wire frame and the connections, a terrific combination, love it all! Well about names, no suggestion from me... I'm hopeless
Thank you for the cute sea horses, no fear of them :) well I would not hold them in my hand though...
Oh the things you will do with stakes and your cool reclaimed aluminum. Thank you much for the lovely comment.
DeleteAre you saying that when you're out kayaking, you don't scoop up sea life and let it crawl all over you? What's the fun in that, Lucie? :)
Hey, thanks for all the tool tips! Inspiring new work. Your studio must be unpacked with all this cool stuff being created.
ReplyDeleteOh you positive thinker, you. Um...mostly unpacked...well kinda sorta unpacked....ok, some of it is unpacked.
DeleteThanks so much for takin the time to edge ih mi cate us dummies out here... Ok I don't have any of that cool stuff... Husbands lends me some of his tools but they are industrial size...like Kim I too am tool less so. Feel better in a way but not really... Wish I could take one of yer classes or all od them... Get me outta my comfort zone... Love new stuff..
ReplyDeleteCynthia
oooh I bet you can have a load of fun with your artist husbands tools. So this is how I got these tools. In addition to saving up for the big ones, I make it easy for the hubs to get them for anniversary presents. I give him my wish list with the item order # and where to get it! hahahahah.
DeleteThanks for the great tool post. I'd like to try that rolling mill option...great new earrings too!
ReplyDeletePounding out a design on the metal is a blast. Please show us if you try it.
DeleteWhat a resource..! Thanks for sharing the tips! I am going to save this post for reference! :)
ReplyDeleteThank you Hundred Colors and welcome! Hope it will prove useful.
DeleteVery cool and usefull post about tools. The best tool is your imagination!
ReplyDeleteThe earrings are terrific.
Appreciate that! Speaking of imagination, your shop is chock full of great and unique creations.
DeleteAnother feast for the eyes. I love scrolling down your blog posts, because I know there is always some new, delightful treasure or surprise just ready to pop up. So fun to see the tools you use, both the traditional and non-traditional ones. Great tip about using leather scraps to protect your anvil too... thank you for this fabulous post!
ReplyDeletehahahaha I thought you were going to say you loved scrolling down to see the animal photo. Thanks so much, Melinda!
DeleteThe earrings and necklace are gorgeous! I am now in tool envy..... but I have been known to grab something out of the ordinary to make do. A rawhide dog bone takes the grand prize though. You never know what you have laying around until you're in need and your imagination kicks in. Thanks for the leather tip for the anvil and the nod to Harbor Freight for alternative shopping.
ReplyDeleteThere are so many fun places in your area to hunt for treasures. I bet you'll run across some great old tools at Webster or Rennigers or antique row on Orange Ave, if you go to these places. Happy hunting Bond girl!
DeleteSo jealous of your tool stash. I will photograph my dapping block because it's hilarious. It's like a doll's dapping block, so very tiny!
ReplyDeleteCool earrings.
is it one of those tiny white delrin ones? I find them totally useless. My discs always get stuck in the wells, then I have to dig them out, inevitably ruining them. Do you have any tips for using those?
DeleteAA - always great to see other metal workers tools - and I must say I have a little tool-envy given the array you showed - but they all look like they get a good work out. I like the amount of work you have put into the folding and chasing of the copper piece for the necklace - it has worked out really well. Go well and hammer on. B
ReplyDeleteThanks much, Barry. Btw, Your new book looks fantastic! So nice to see your amazing work displayed in that manner.
DeleteWelcome Sidra! Thanks so much. Appreciate your taking the time to leave such a nice comment.
ReplyDeletethanks for sharing photos of all your tools, especially the "made up" tools. I already have alot of them at home & didn't think of using them,
ReplyDeleteA in CA
Great ideas and beautiful work! I just picked up a set of round pry bars from Harbor Freight and they make great ring mandrels. I can't seem to paste the direct link, but you should be able to find them at www.harborfreight.com for about $7.99. Keep up the good work!
ReplyDelete